Download from Google Play console: https://play.google.com/store/apps/details?id=co.seqvence.seqvence2.pad.free&hl=en_US and follow the instructions
Application requires permission to record audio. If you did not allow at the startup you can long press on Groovebox icon, select App info-> Permissions, and add “Microphone” by selecting “Allow only while using the app”
Launcher is the central place of the application where the user triggers patterns on and off by tapping them. It is organized as a grid, where columns represent tracks (instruments), and each track can have up to 8 patterns (musical fragments).
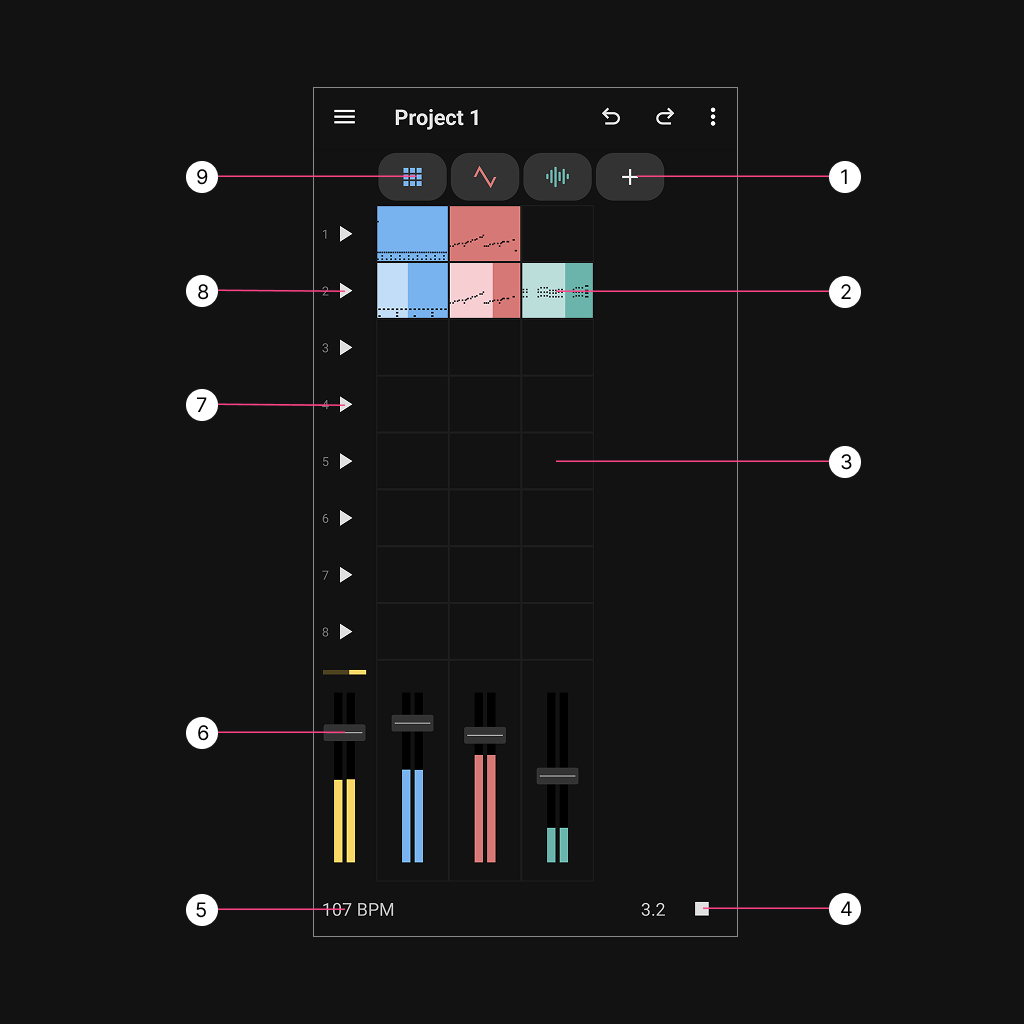
Add Instrument button – adds a new instrument track.
Pattern – a musical fragment consisting of several bars. Patterns can be moved using drag and drop. Long-pressing a pattern opens a menu with additional actions.
Empty pattern slot – tap to create a new empty pattern.
Play / Stop – plays or stops the selected patterns.
Tempo (BPM) – tap to set the tempo in beats per minute.
Volume controls – each track has its own volume slider; a global volume control is located on the left.
Scene line – represents a horizontal arrangement of patterns.
Play Scene – plays all patterns in the selected row (scene).
Editor button – opens the instrument and pattern editor. Long-press to open options for swapping the instrument type.
Open Automation View – opens to automation editing view.
Show / Hide Bar Macro (6) – toggles the bar macro controls.
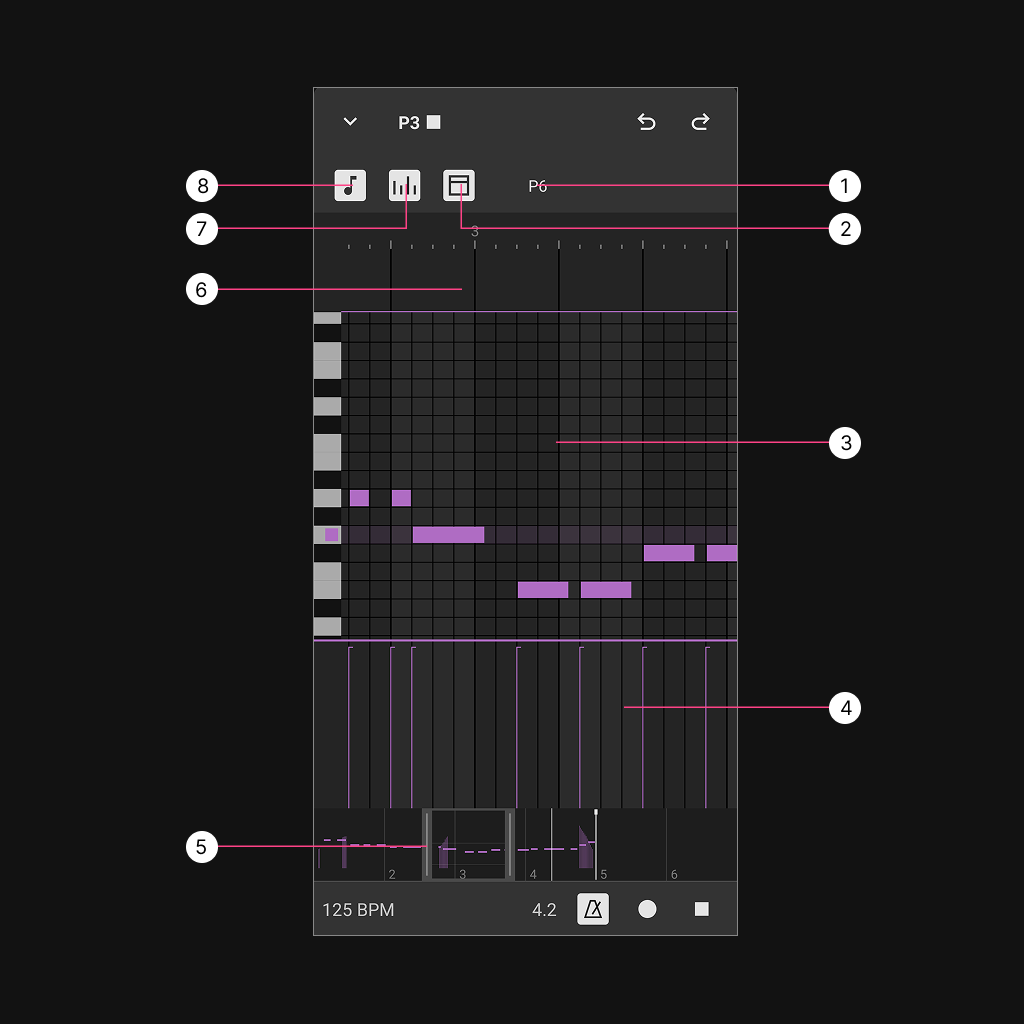
Note Canvas – tap to add a note.
In the Drum Editor, tap a note to remove it.
In the Piano Roll, tap a note to open a menu with a delete option.
Use two fingers to resize (zoom) the canvas.
Long-press and drag to open the selection menu.
Tap anywhere on the canvas to clear the selection.
Note Velocity – drag the bar up or down to adjust the velocity value.
Pattern Preview – swipe left or right to navigate within the pattern. Drag the left or right edge to resize the visible area.
Bar Macro – drag right to copy selected bars or left to delete them. An options menu appears with tools to move selections in all directions, snap to grid, and more.
Show / Hide Note Velocity (4) – toggles the velocity editor.
Show Notes – tap to switch back from Automation view.
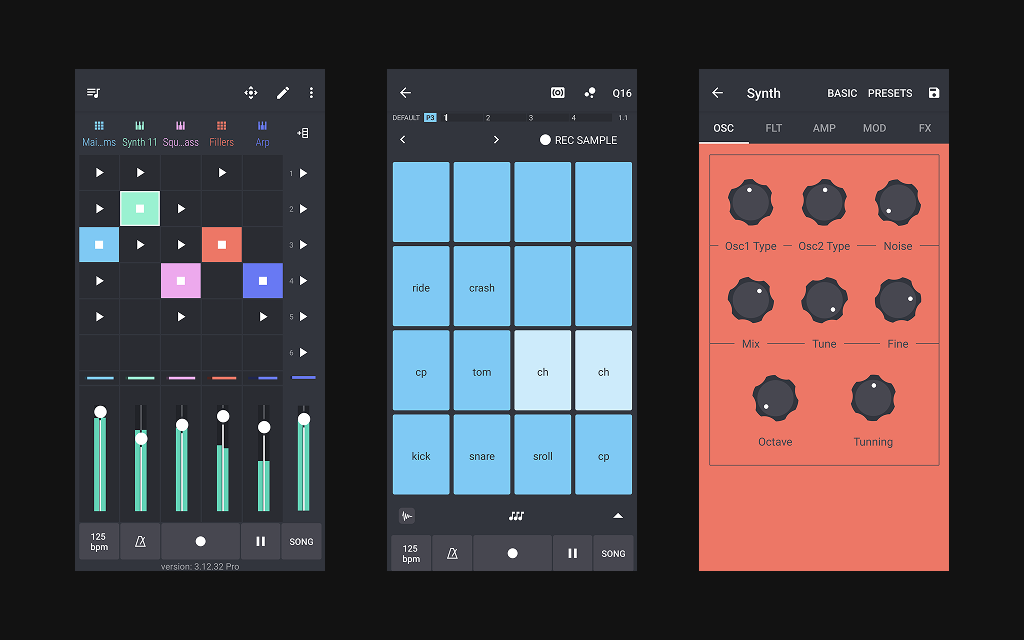
Generates sound in real time using oscillators, filters, and modulation for fully customizable tones.
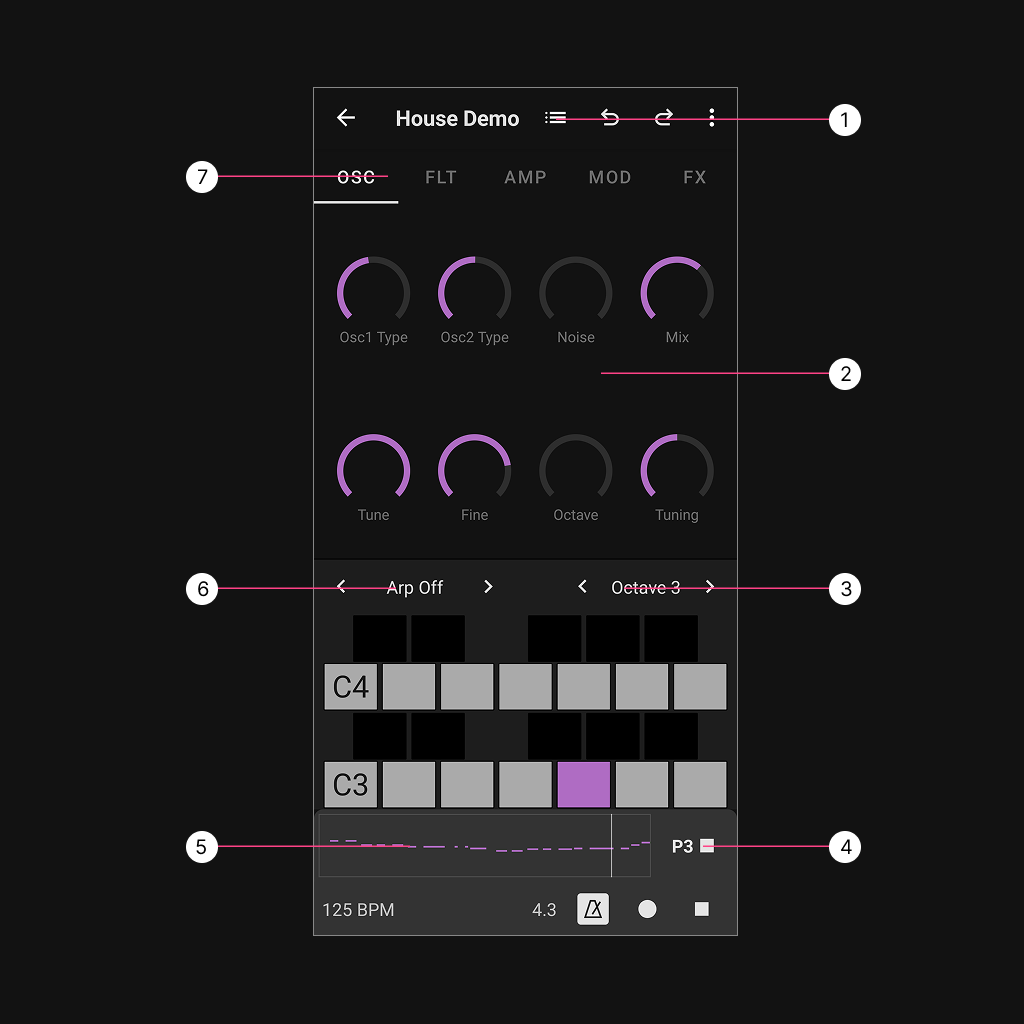
Synth Presets. The application comes with a set of factory presets, and users have options to to save their own presets.
Synth parameters
Set keyboard octave
Play/stop selected pattern
Pattern preview. When tapped - opens pattern editor.
Arpeggios
Synth options: Oscillators, Filters, Amplitudes, Modulators, FX
Plays back user-loaded audio samples, allowing editing, looping, and manipulation of recorded sounds.
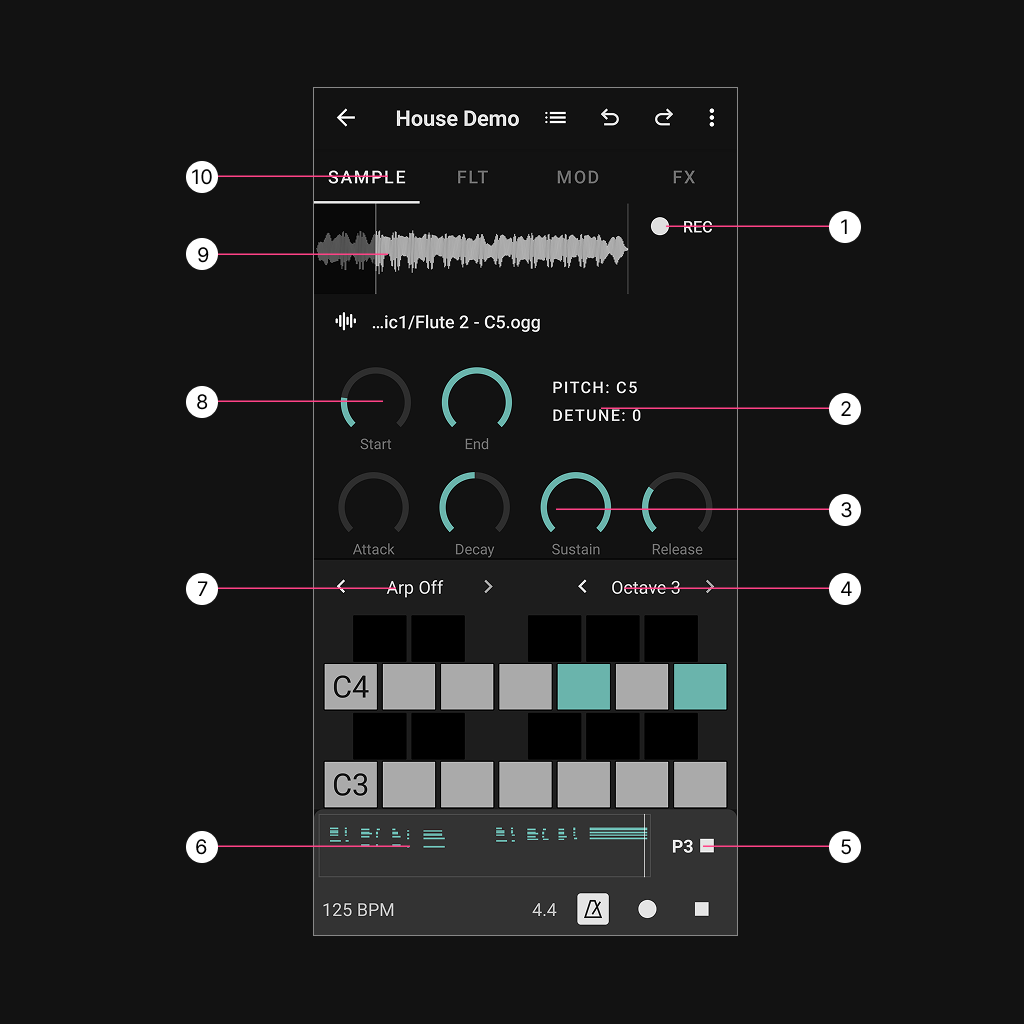
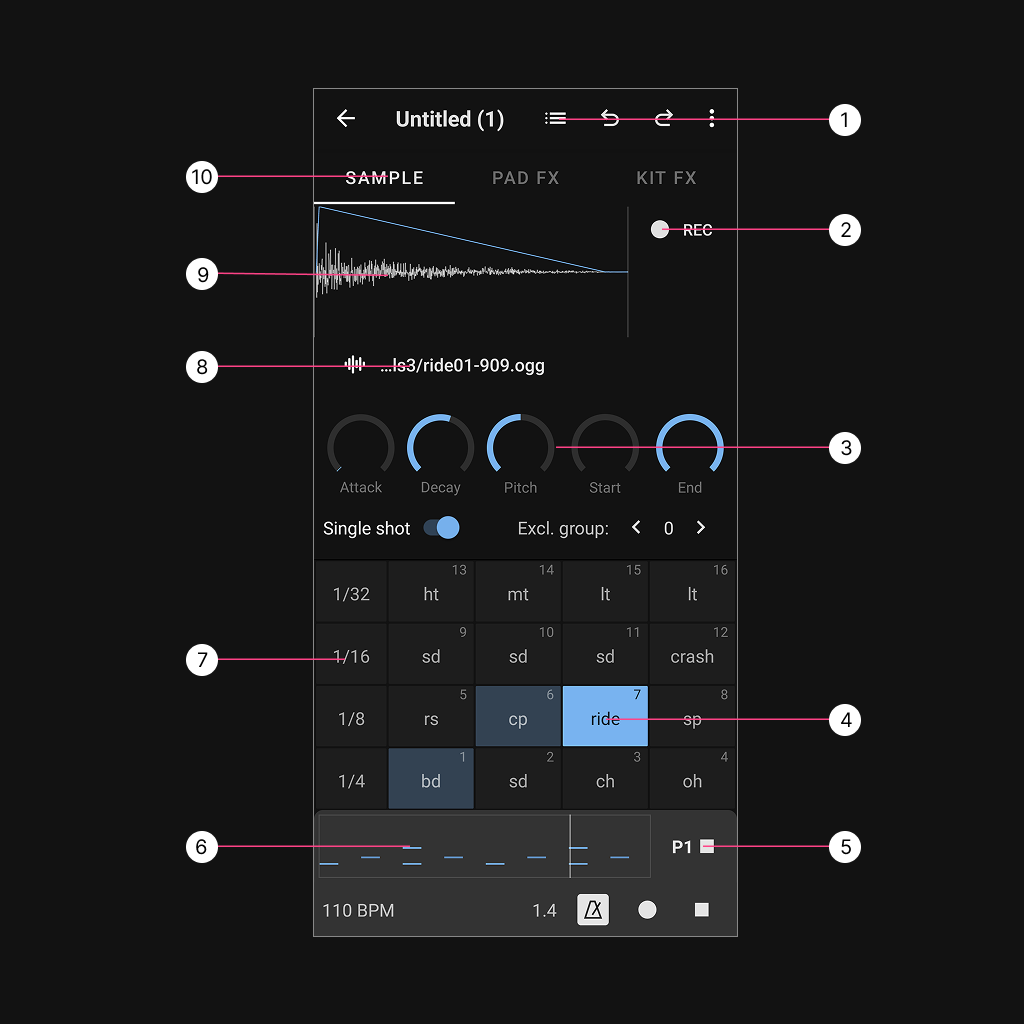
Record sample
Set pitch and detune
Set Attack, Decay, Sustain, Release for the sample
Set octave on the keyboard
Play/Stop current pattern
Pattern previewer. Tap to expand note editor.
Keyboard arpeggio selector.
Sampler start and end selector.
Sample previewer. Tap on it to preview audio.
Filter, Modulation, FX
Drum engine with sequenced patterns and individual control over each drum sound for beats and percussion.
Change complete drum kit
Record sample
Set Attack, Decay, Sustain, Release for the sample
Drum pad
Play/Stop current pattern
Pattern previewer. Tap to expand note editor.
Repeater.
Current sample name. Tap on int and the option to select a different sample will show up.
Sample previewer. Tap on it to preview audio.
Sample FX, and FX of the complete kit.
Users can record automation by pressing the record button and moving the desired knob, or create it manually via the top-right menu by selecting “Add Automation”.
In both cases, a menu item for the newly created automation appears in the Notes Editor. Selecting it opens the Automation Editor, where automation can be edited by dragging a finger across the screen. Automation is also visible in the pattern preview and can be removed using the menu option in the top-right corner.
Place your drum samples in the Music or Downloads folder. Select the pad you want to change, tap the current sample name, and use the bottom-sheet navigator to browse to the folder containing your files.
Place your audio samples in the Music or Downloads folder. Tap the current sample name, and use the bottom-sheet navigator to browse to the folder containing your files.
Groovebox 3 is now available as a separate application, so you can keep using the previous version just as you did before December 30, 2025. You can download it here:

If you have installed Groovebox 4 and would like to keep your existing work from Groovebox 3 and continue using it, please follow the steps below:
Do not uninstall Groovebox 4, as it is required to preserve all of your previous work. You can have both Groovebox 4 and Groovebox 3 installed on your phone at the same time.
Now we need to make all your previous work available in the Groovebox 3 application:
Start Groovebox 4 i tap on the app menu (three lines top left), go to My Projects. In the My Project screen, tap on the menu (three dots top right) and select Backup projects. New version of backup is created in Downloads/GrooveboxBackups
Start Groovebox 3 and tap on the app menu (three lines top left) i select Restore Projects. Navigate to the latest backup file from Download/GrooveboxBackup
All previous projects will be now visible in Groovebox 3.
Additional info:
Groovebox 3 will be supported in the future and will receive updates.
Groovebox 3 is not able to open projects created by Groovebox 4.
Your existing subscription (if any) remains linked to the Groovebox 4 application.
Subscriptions are managed through Google Play Store. Visit "Subscriptions" in Play Store settings to modify or cancel your plan.
Yes, you can install it on any number of devices that are signed in with the same Google account.
Need More Help? If you need additional assistance, please write us at groovebox.application@gmail.com.
Last updated: February 2026